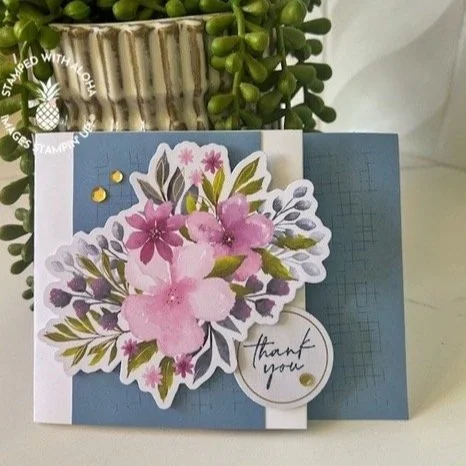
Garden Of Thanks: 4 Alternative Cards
Expressing gratitude has never looked so beautiful! The Garden of Thanks Kit from Stampin' Up! is a floral-filled treasure trove for crafting stunning thank-you and appreciation cards. However, I wanted to take this kit to new heights. Inspired by the kit's vibrant watercolor blooms, I've created four unique card designs that go beyond the ordinary. From intricate die cuts to unexpected color combinations, these cards showcase how creativity can transform a kit into a personalized masterpiece. Let me inspire you to create your garden of thanks!
Garden Of Thanks: 4 Alternative Cards | Part 1
Want to make these cards along with me? Follow the video and pause as you need to between each step. By the end of the video, you’ll have four beautiful cards to send off!
To get started, you’ll want to buy the Garden of Thanks Kit (Item #164398). To read the details of the kit, make sure you check out the featured post and then come back here to see the 4 added designs I created. Adding just a little bit of extra cardstock you can really stretch your kit contents to make so many more cards!
My 4 Alternate Card Designs I Made With The Garden of Thanks Kit
Alternate project #1: Thank You Card With Gift Card Holder
Alternate Project #2: Thank You Card
Card #1 Pocket Card for Gift Card
Take a 4-1/4” x 11” piece of basic white cardstock and score it at 1-1/2” and 5-1/2”.
Glue the pocket on each side.
Take a blue card base from the kit and cut it down into two pieces measuring 4-1/4” x 2-3/4”.
Cut 1” x 4-1/4” piece of a floral card base and glue to the top of the pocket piece for contrast.
Punch out a floral piece and a circle from the card kit.
Stamp ‘Thank You’ in Misty Moonlight ink.
Attach the circle greeting to the card base.
Add sequins
Card #2-Thank You Card
Take 4-1/4” x 11” white card base score at 5-1/2”.
Punch out large floral, banner, and thank you text from the kit.
Use the strip leftover from the blue card base; adhere it to the left side about 1/4” from the edge.
Add dimensionals to the back of the floral cut-out and apply it to the front of the card, as shown in the video.
Glue the phrase ‘thank you’ to the top of the banner and then attach the banner to the card base.
Finish with sequins
Alternate Project #3: I appreciate you so much card
Card #3 I Appreciate You So Much!
Basic white card base cut 4-1/4” x 11”, scored at 5-1/2.
Take a decorative white card base from the kit and it cut down to 5” x 3-3/4”.
As shown in the video, Take one of the large flower die-cuts from the kit, punch it out, and cut it into two pieces.
Punch a label and one of the Fresh Freesia sprigs and trim as shown.
Adhere pieces to the decorative white layer as shown.
Stamp the greeting in Misty Moonlight ink and adhere with dimensionals.
Add sequins.
Add this layer to the basic white card base.
Alternate Project #4: I appreciate you hula girl
Card #4 I Appreciate You- Hula Girl
White card base 4-1/4” x 11” scored at 5-1/2”.
Cut a floral card base into two pieces, 1-1/2” X 5-1/2” and 2” x 5-1/2”, and adhere to the card base as shown.
Take a piece of Blackberry Bliss and Basic White cardstock and cut it into a rectangle—adjust the size based on the stamped image you are using.
Punch out a tag and stamp the greeting in Misty Moonlight Ink.
Stamp focal point on white cardstock.
Attach the matted focal point and greeting to the front of the card.
Finish the card by adding sequins.
Now that you’ve made your cards, wouldn’t it be fabulous to make a coordinating box that holds the cards and matching envelopes? I’ve got that post coming soon!
With love and blessings,
Cindy


